S.E.P are the only NZ company who have built their own machine to manufacturer Stainless steel wire mesh cable trays.

Our wire mesh cable trays are fabricated using: 5mm—T304 / ½ Hard Tempered Stainless Steel Rod. This rod is sourced from overseas and has been manufactured to the International specification Din 1.4571 (V4A) AISI 316 TI. Characteristics of the material used and the finished product have been designed to meet the most demanding requirements of electrical industry.

Individual units have a standard length of 3metres; side walls of 60mm, with width variations of 60mm,100mm,150mm,200mm,300mm,400mm,450mm,500mm & 600mm.

In the smaller sizes, 60mm,100mm and 150mm we also manufacture with 30mm side walls.

Our Stainless Steel Wire Basket Cable Trays allow air circulation to keep wiring cool and offer good resistance to corrosion in natural and food atmospheres.

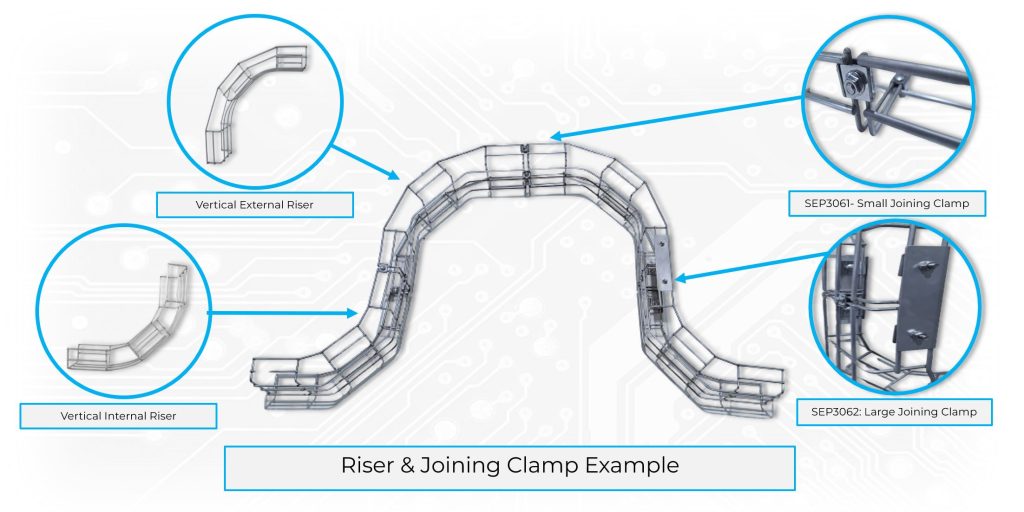
S.E.P also offer pre-made horizontal bends, internal risers, external risers and horizontal ‘T’ sections. We also manufacturer and supply universal joining plates, joining clamps, joining strips, hanging brackets, side supports, centre divider, conduit supports & mounting brackets.

All accessories are supplied pre-drilled complete with M6 x 16mm Coach bolt and Flange Nuts as required. Units can be welded together on site; a Quick Fit range of accessories is also available.

1. Components

Components:

  • Wire Mesh Tray: The main component, available in various sizes.
  • Couplers/Splices: For joining sections of the tray.
  • Supports: Brackets, hangers, or threaded rods for mounting the tray.
  • Covers: Optional, to protect cables.
  • Dividers: To separate different types of cables.
  • Drop-outs/Drop-throughs: For safely routing cables in and out of the tray.

Tools:

  • Cutters: For cutting the tray to size.
  • Pliers/Wrenches: For Bending tabs & tightening fasteners.
  • Level: For ensuring correct alignment.
  • Measuring Tape: For accurate placement.
  • Drill: For making holes if needed.

2. Planning

Cable Routing:

  • Identify Pathways: Determine the optimal path for the tray, avoiding obstacles and considering future expansion.
  • Load Calculation: Assess the cable load to ensure the tray can support it. (See SEP Load chart below) Consider weight, fill capacity, and cable type.

Tray Selection:

  • Material: Choose based on the environment- SEP Cable trays are manufactured in Grade 304 Stainless steel we can supply Grade 316 on request
  • Size: Select based on cable volume and future expansion.

3. Installation Steps

1. Mounting Supports:

  • Determine Spacing: SEP recommend supports to be spaced 1.5m apart.
  • Install Supports: Secure brackets or hangers to walls, ceilings, or under raised floors. Ensure they are level and aligned.

2. Assembling Tray Sections:

  • Cut to Size: Use wire cutters to trim sections as needed.
  • Join Sections: Use couplers or splices to connect tray sections.
  • Bolted Joiners: To be torqued to 8 Nm
  • Grounding: Ensure trays are properly grounded if required by code or application.

3. Securing to Supports:

  • Place Tray on Supports: Ensure trays rest securely on the supports.
  • Fasten Tray: Use appropriate clamps or bolts to secure the tray to the supports.

4. Laying Cables:

  • Place Cables: Lay cables loosely in the tray, avoiding tight bends or stress.
  • Separate Cables: Use dividers if needed to segregate different types of cables (e.g., power and data).
  • Bundle Cables: Use cable ties or straps to bundle cables neatly but do not overtighten.

5. Adding Accessories:

  • Install Drop-outs/Drop-throughs: For safe cable entry/exit points.
  • Attach Covers: If using, snap covers into place.

4. Safety and Compliance

  • Code Compliance: Follow local electrical codes and standards.
  • Weight Limits: Do not exceed the load capacity of the tray or supports.(See SEP Load chart below)
  • Regular Inspection: Periodically check the installation for damage, secure fittings, and proper cable management.

5. Advantages and Considerations

Advantages:

  • Versatility: Easy to modify and expand.
  • Airflow: Open design allows for better cooling.
  • Visibility: Easier to inspect and troubleshoot cables.

Considerations:

  • Environment: Select appropriate materials for the installation environment.
  • Support Structure: Ensure adequate structural support for the trays.

6. Maintenance

  • Routine Checks: Inspect for physical damage, loose fittings, or overloaded sections.
  • Cleanliness: Keep trays free from dust and debris.
  • Documentation: Maintain records of inspections and modifications.

Summary

Using wire mesh cable tray systems involves selecting the right components, planning the layout, and following precise installation steps. Proper installation ensures efficient cable management, safety, and compliance with standards.

Click the image below to download Technical Information

Please contact us to discuss your requirements


Click the links below to see our range of Wire Mesh Cable Trays & Components